

basicly i followed this guide
How to set Z8 and NAS for recording and timeshift over network.
so im not sure what im missing here

We asking all new users to read the articles below, before creating their first posting or thread.
Please note, in this forum are only English threads and postings allowed, without any exception!
Please follow the forum rules, thank you for your understanding.
basicly i followed this guide
How to set Z8 and NAS for recording and timeshift over network.
so im not sure what im missing here
Path?
NAS and Z8 have static ip?
ON Nas is Z8 Ip allowed to use the shared folder in full?
Path correct like 175n say?
not quite understanding what you mean by this
ON Nas is Z8 Ip allowed to use the shared folder in full?
Path correct like 175n say?
Show us the path you typed in the Network Storage menu
not quite understanding what you mean by this
ON Nas is Z8 Ip allowed to use the shared folder in full?
Means, did you give the Z8 with static IP on NAS Panel all rights to read and write on shared folder.
Path correct like 175n say?
On this picture you can see the root and folders in there. In our example we use "Z8" as shared folder for our z8 box where we want to save our recordings. The proper path to this folder is then (for example) : 192.168.0.200/Z8
In your case it could be: 192.168.0.101/Z8
Create your "iptvrecordings" folder in root, give the Z8 IP all rights for this folder and use your NAS static ip .101 for connect with this path:
192.168.0.101/iptvrecordings
also would rather use nas-share as thats were the folder is that i would like to record too rather then the z8 share i also have static ip for the nas set in my synology router
this is the path i am putting into network path but yet i still get a failed to connect 192.168.0.200/nas-share/iptv recordings
Maybe the space in the path is causing issues. Try to rename your shared folder to iptv_recordings
A static IP address is quite unnecessary and can cause headaches in the future when set up on-device. It would be best if people would set up a so-called “DHCP Reservation”. Those have the same effect as static IP addresses (namely, the device can be found on the very same address on the network time upon time, even after power loss, but they require far less documentation.
To set up a DHCP reservation for your Z8, you will need the MAC ADDRESS, which is different from the Stalker ID required for IPTV services.You can find the MAC address in Network Settings on ze Z8.
As I’ve explained, you can configure a DHCP Reservation (sometimes referred to as a Reserved IP Address) on your router, usually in the same section where its DHCP server is configured. Most routers nowadays allow you to go to the DHCP server section and simply tick a box behind any listed client along the lines of “always use this address”. Exact information on how things are set up can be found in your router’s manual or help pages.
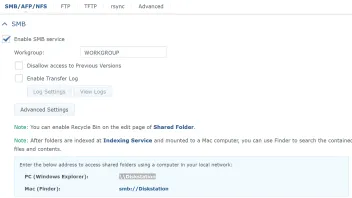
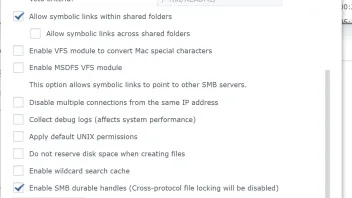
Now that that’s dealt with, I’ll show you the config I use on my Synology NAS, which does differ from what Formuler advise you to do. This is because, as the Z8 does not use NFS by default, there is absolutely no need to set it up. SMB will do just fine if you don’t want to go through with NFS. Also, contrary to what Formuler say in their documentation, neither the Local Master Browser setting nor the Guest account need to be enabled on the Synology (these both pose security risks! leave them disabled if at all possible!)
First, head to Control Panel > File Services and configure the main settings for SMB as follows (do not close the window yet):

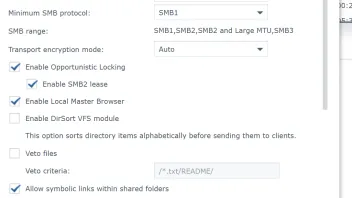
In the File Services window, click on Advanced Settings and configure them as depicted in the following two screen shots (click Apply when done).
Part 1:
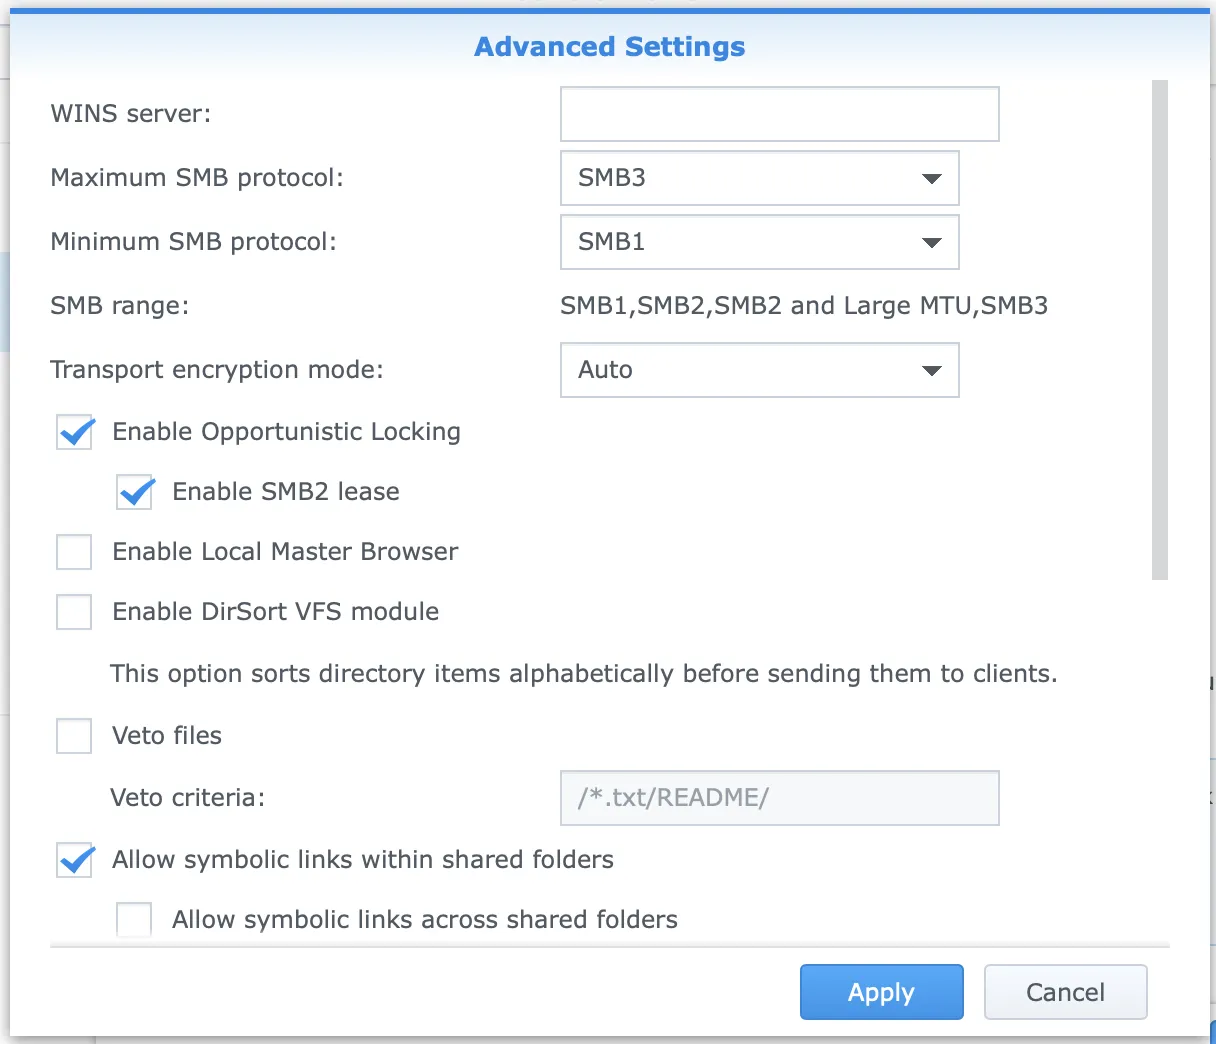
Part 2:

Now click Apply in the main File Services window to close that (depending on your DSM version and settings, you may have to manually close out of it by clicking the X in the top right corner after clicking Apply).
Next, staying in the Control panel, head to User and configure a new account, or if you already had one, configure its settings as follows (mine is called recordings. The name doesn’t really matter, as long as you use the EXACT same name when configuring your Z8 later.) Also, keep in mind that I’ll only show relevant pages here. Pages I don’t show have been left unaltered in my config).
The Info tab should look like this (again, the name can differ):

On the Permissions tab, take note of the folder indicated with the arrow. This is the folder my Z8 can access. You may disregard any and all of the other folders listed. Also note that the name can differ from mine here, too, as long as you use the EXACT same chosen name when configuring your Z8. The settings on the permissions tab should look like this:

After configuring the user account, close out of its window by clicking OK. You’ll be back at the control panel. Finally, we’ll take a look at the Shared Folders section. In the picture, the folder marked with an arrow is the relevant one for our issue. It’s called Z8 in my case:

In there, either create a share specific to the Z8, or, if that’s already done, click the arrow next to it and verify things look like this:

As a final step on the Synology, we will cross-check the permissions here. Click Edit. Things should be configured as follows. I will only show tabs where relevant changes need to be made, things that aren’t shown have been left unchanged in my configuration:
The General tab should look like this:

The Permissions tab should look like this (Take note of the account marked with an arrow, that’s the account we’ve created before. I’ve called it recordings, you may have chosen a different name):

That’s the Synology dealt with. You can close out of all windows, taking care to save your settings. When configuring your Z8, you should point it to the folder (share) you created for it on your Synology. So, in my case, I’d point it to: smb://10.0.1.10/Z8 and use recordings as the user name for it:
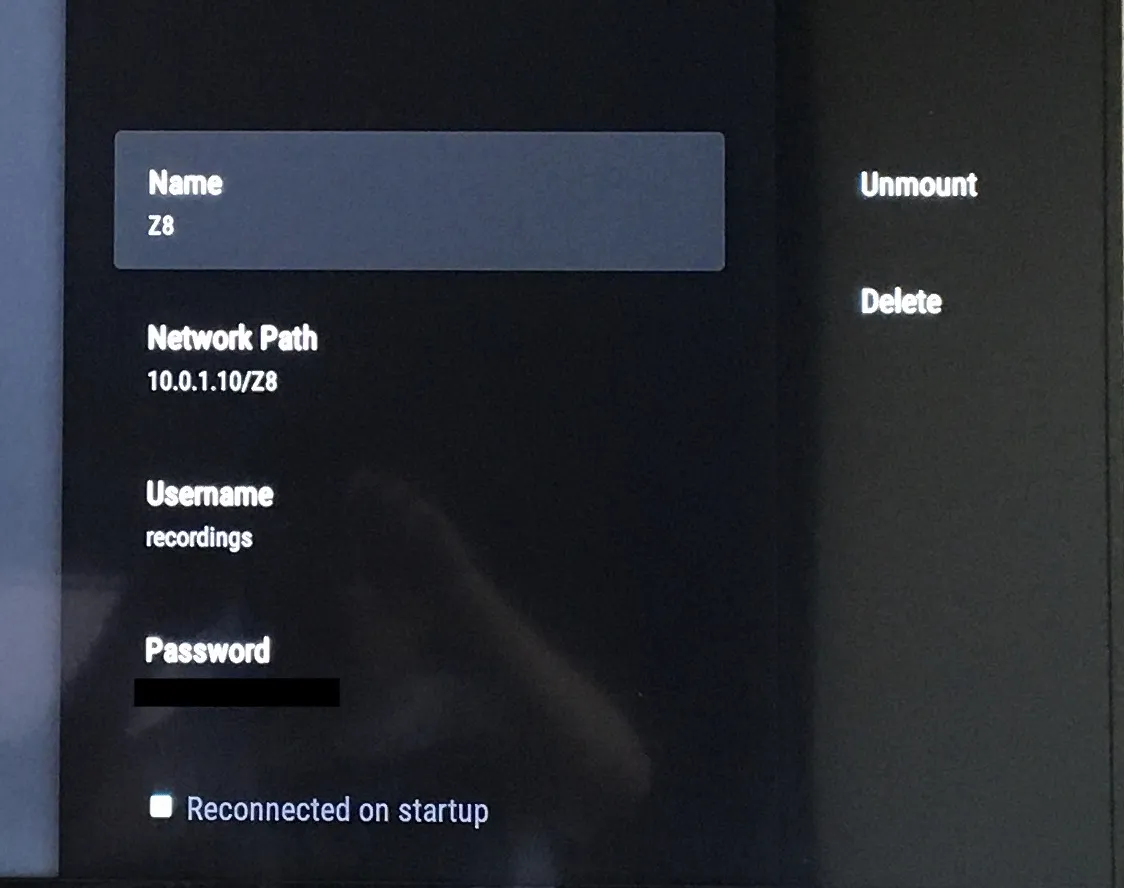
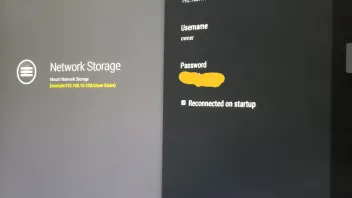
As a final point of attention on your Z8, assure that Reconnect At Startup is CHECKED. It’s not clearly visible on my photo (I still need to figure out a way to take proper screenshots on the Z8).
As 175n pointed out, spaces aren’t allowed in anything network-related. normal hyphens should be just as fine as underscores, though. Also, to mitigate the chance of failure, create a share specific to the Z8. Do not use a folder within a specific share. So, 192.168.0.200/Z8 (for example) would be fine, but 192.168.0.200/nas-share/Z8 (again, for example) may cause problems because of permissions.
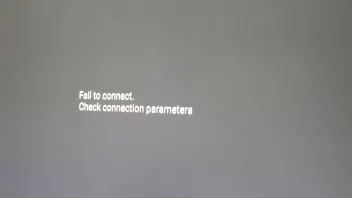
The Z8 isn’t really good at clarifying what goes wrong when connecting. It’ll just say: "connect failed, check parameters”, but it doesn’t specify what went wrong. In your case it could be obvious as, you’ve tried to use a space, which is an absolute no-go. But I did not, and it took me a while to figure out what went wrong for me. The settings discussed above work, but I also found a rather peculiar “bug” on the Z8. You see, I have a keyboard connected, and I tend to navigate through fields using the Tab key (which, for some reason, is also available on the remote). Do not do that in this section of the configuration though. Hit Enter (Centre key on remote) after entering each value, or the value will not be saved correctly, which will also result in failure to connect.
also would rather use nas-share as thats were the folder is that i would like to record too rather then the z8 share i also have static ip for the nas set in my synology router
this is the path i am putting into network path but yet i still get a failed to connect 192.168.0.200/nas-share/iptv recordings
Ok, i will ask you in different way.
Is your NAS IP 192.168.0.4?
What for is 192.168.0.101 then? Your Z8 Box with static ip, right?
If so.
Go to your subfolder "iptv recordings" and rename first to "iptvrecordings".
Try then with this path to connect : 192.168.0.4/nas-share/iptvrecordings

As a final point of attention on your Z8, assure that Reconnect At Startup is CHECKED. It’s not clearly visible on my photo (I still need to figure out a way to take proper screenshots on the Z8).
If USB Stick connected and Screenshot folder was created: Hold recording button 2 sec.

If USB Stick connected and Screenshot folder was created: Hold recording button 2 sec.
SAM Thanks! Will remember that one…! Would be nice if screenshots could also be saved to the network share, though… Consider this a feature request ![]()


